Basement Finishing Project - Introduction
Well you may or may not know that I am finishing my basement. It's a project I started back in late May. I really didn't expect it to take this long. Neither did my wife, or else she may not have let me do it.
I am going to do a series of blog postings outlining this project from start to finish. It may take a while, but I'll start at the beginning and hopefully soon I can catch up to the present. Unfortunately, many of the pictures I took along the way are AWOL on a 256MB SD card that I am having trouble locating. If it ever turns up I will get the pics online and add some to the appropriate entries.
In The Beginning...
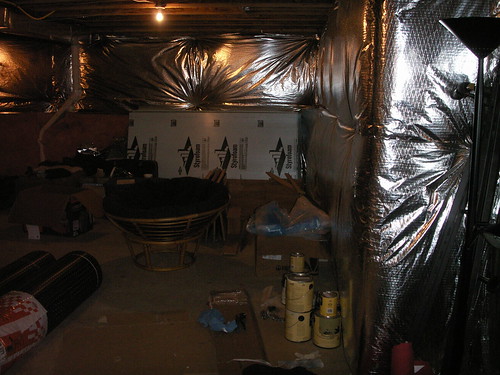
 When we moved into the house, the poured concrete basement walls were fully covered (top-to-bottom) with fiberglass blanket insulation and a layer of foil paper over top of that (Fig. 1).
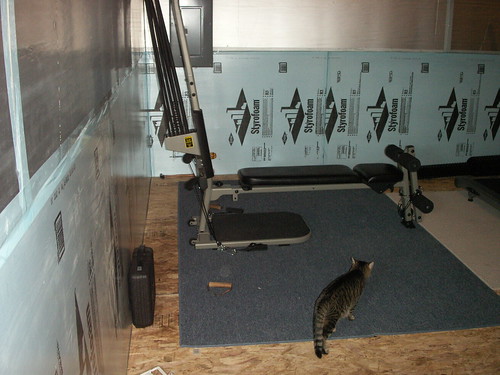
After researching basement insulation systems, I determined that I would replace the existing insulation with a half-inch of rigid foam insulation directly against the concrete exterior walls. I used foil-faced polyisocyanurate on the top-half of the wall (which can dry to the outside,) and extruded polystyrene (Styrofoam blueboard) on the bottom half (Fig. 2). The blueboard is supposed to be vapor-permeable, which allows the lower half of the wall to dry to the inside (assuming I do not use Kraft-faced insulation or any other type of vapor barrier in the wall construction.)
I decided to use a metal stud wall inside of that. Benefits of metal studs are: they are all perfectly straight, they do not burn, and they do not support the growth of mold and mildew. I would place unfaced fiberglass batts in between the metal studs. This would give me an overall R-value of about 16 for my basement walls. (Unfaced fiberglass batts for 3-1/2 inch thick stud walls have are rated R-13. Half-inch thick foil-faced polyisocyanurate is R3.3. Half-inch thick Styrofoam blueboard is rated R-3. Nothing in my basement is rated NC-17.)
I had considered installing an insulated subfloor by laying down a vapor barrier, then 2x4 sleepers and putting some kind of rigid foam insulation between them. However, this would have made that first step up the stairs really short and probably require me to raise all the stairs to get it to code. Also, the door that leads outside would have to be raised to clear such a subfloor, or I would have to have a step-down area by the door which would have been a major tripping hazard.
 My dad suggested I look up something called System Platon (Fig. 3). Genius*! This stuff is made of 24mil dimpled polyethylene, which creates an impermeable moisture barrier, yet leaves a small airspace to allow the concrete floor to dry out if it becomes wet. You can lay down tongue-and-groove OSB right on top of it, giving you a dry subfloor that is not as cold as the concrete beneath it and costs less than 1.5 inches of headroom! My basement door still opens (and still has enough clearance for whatever finished flooring I choose, probably a wood laminate,) and the bottom stair step is not noticeably different in height than the rest of the steps.
In the next installment, I will discuss how I created my basement plans and obtained my building permits. Don't you just love cliffhanger endings?
* Yes, this refers to my dad and the inventor of System Platon.
I am going to do a series of blog postings outlining this project from start to finish. It may take a while, but I'll start at the beginning and hopefully soon I can catch up to the present. Unfortunately, many of the pictures I took along the way are AWOL on a 256MB SD card that I am having trouble locating. If it ever turns up I will get the pics online and add some to the appropriate entries.
In The Beginning...
 When we moved into the house, the poured concrete basement walls were fully covered (top-to-bottom) with fiberglass blanket insulation and a layer of foil paper over top of that (Fig. 1).
After researching basement insulation systems, I determined that I would replace the existing insulation with a half-inch of rigid foam insulation directly against the concrete exterior walls. I used foil-faced polyisocyanurate on the top-half of the wall (which can dry to the outside,) and extruded polystyrene (Styrofoam blueboard) on the bottom half (Fig. 2).
 The blueboard is supposed to be vapor-permeable, which allows the lower half of the wall to dry to the inside (assuming I do not use Kraft-faced insulation or any other type of vapor barrier in the wall construction.)
I decided to use a metal stud wall inside of that. Benefits of metal studs are: they are all perfectly straight, they do not burn, and they do not support the growth of mold and mildew. I would place unfaced fiberglass batts in between the metal studs. This would give me an overall R-value of about 16 for my basement walls. (Unfaced fiberglass batts for 3-1/2 inch thick stud walls have are rated R-13. Half-inch thick foil-faced polyisocyanurate is R3.3. Half-inch thick Styrofoam blueboard is rated R-3. Nothing in my basement is rated NC-17.)
I had considered installing an insulated subfloor by laying down a vapor barrier, then 2x4 sleepers and putting some kind of rigid foam insulation between them. However, this would have made that first step up the stairs really short and probably require me to raise all the stairs to get it to code. Also, the door that leads outside would have to be raised to clear such a subfloor, or I would have to have a step-down area by the door which would have been a major tripping hazard.
 My dad suggested I look up something called System Platon (Fig. 3). Genius*! This stuff is made of 24mil dimpled polyethylene, which creates an impermeable moisture barrier, yet leaves a small airspace to allow the concrete floor to dry out if it becomes wet. You can lay down tongue-and-groove OSB right on top of it, giving you a dry subfloor that is not as cold as the concrete beneath it and costs less than 1.5 inches of headroom! My basement door still opens (and still has enough clearance for whatever finished flooring I choose, probably a wood laminate,) and the bottom stair step is not noticeably different in height than the rest of the steps.
In the next installment, I will discuss how I created my basement plans and obtained my building permits. Don't you just love cliffhanger endings?
* Yes, this refers to my dad and the inventor of System Platon.
Labels: basement


2 Comments:
Hey little bro.. you'll prob never read this, but do ya think you might get more work done on the basement if you weren't spending time blogging about it? Huh?
Har har :)
Post a Comment
<< Home